Monday, June 30, 2014

Winnie & Walter Share the Love Week - Watercolouring using Distress Inks


Hellooo my dear craft friends,

Winnie and Walter is doing Share the Love week featuring Distress Inks by Ranger. Woohoo! who does not like distress inks, right? It is a must have ink in your craft collection. I love love distress inks and this entire week the Talent from Winnie & Walter is going to share some fantastic projects using Winnie & Walter products and distress inks. You are in for a treat.


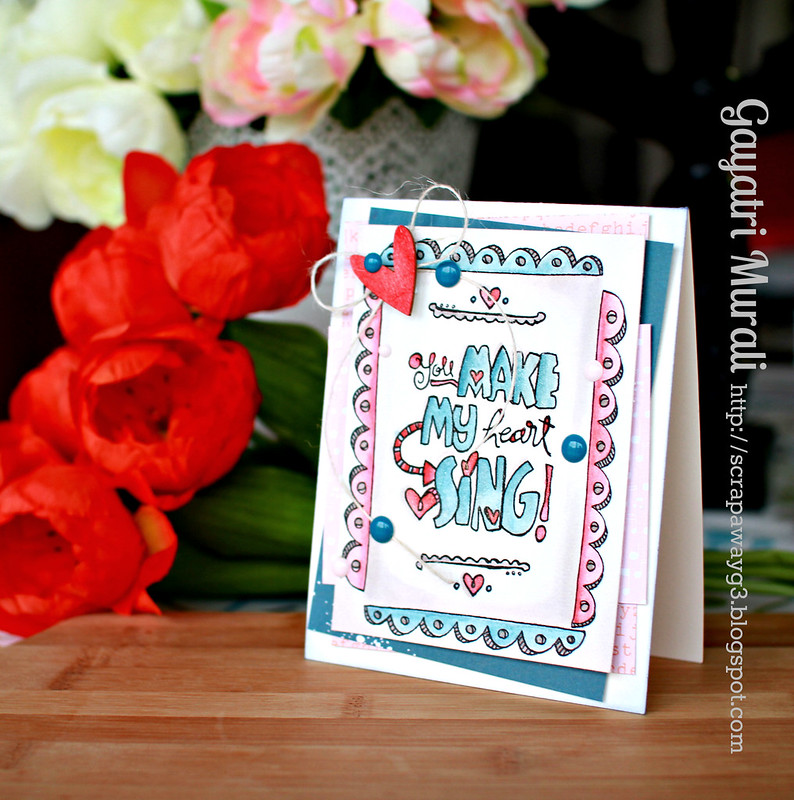
Today, we are showcasing watercolour technique using distress inks. Distress inks are great to use as watercolour medium because of their ability to react with water. Simply squish some ink on the craft mat or an acrylic block, dilute with water to your liking and watercolour using a brush. Easy Peasy :)

Here is my take on the watercolour technique.

Mr. & Mrs.

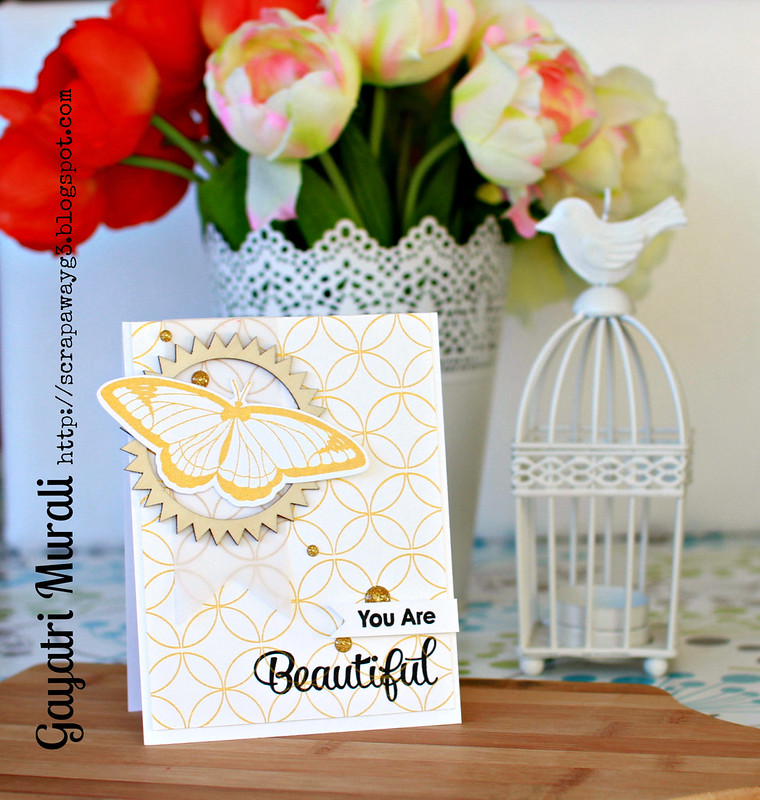
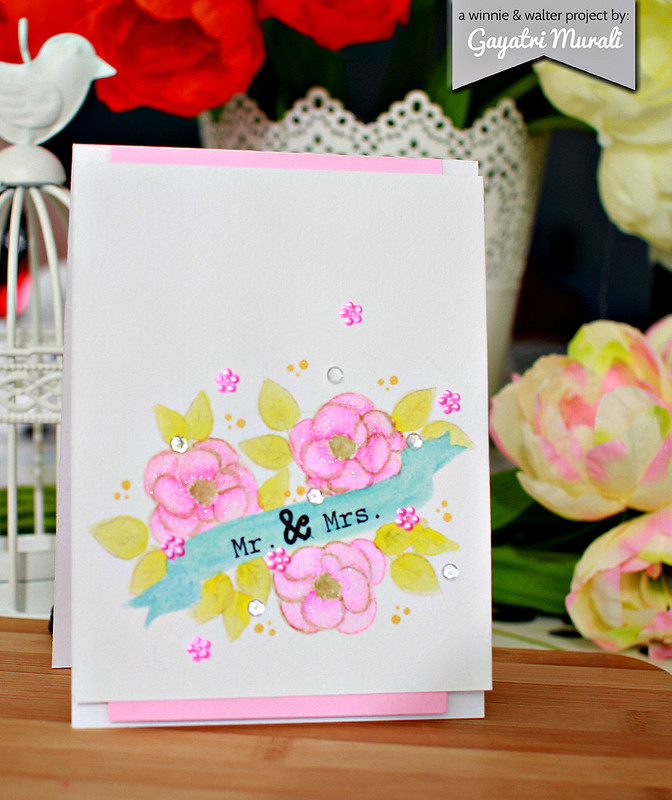
I have used The Big, the Bold and Extras stamp set from Winnie & Walter  to make my card. I have used watercolour paper. I made a mask of the banner using masking paper. I stuck the mask on the watercolour paper as I wanted, then stamped the flowers and leaves using frayed Burlap distress ink. I then brushed the inside of the flowers with Worn Liptstick distress ink and Picked Raspberry distress ink for shading. I used Shabby Shutters distress ink for the leaves and Crushed Olive for the shading. When dry, I peeled the mask and stamped the banner with second generation Broken China distress ink I then brushed the distress ink with watercolour bursh to get the watercolour look. I stamped the trio dots using gold ink. The centre of the flowers are stamped with Frayed Burlap distress ink which I then brushed with watercolour bush for the softer look. I added some shimmer using Wink of Stella pen. Once the banner is dry, I stamped the sentiment using Archival Jet Black Ink. Finally accented with the gorgeous Pink flower sequins and 4mm Sparkly Clear sequins from Pretty Pink Posh. To bring out the pink colour form the flowers, I have matted the waterolour paper with pink cardstock showing only top and bottomI love love watercolouring and distress inks is it so easy to work with.

 Check out Winnie & Walter Blog for more Talent inspiration. And there is no sharing the love without giveaways. Yes! Yay! You can participate in the challenges or  leave a comment to be eligible for a chance to win the giveaways. For more details, check out Winnie & Walter Blog for more details.

Have fun crafting with distress ink and W&W stamp set.

My blog signature

Sunday, June 29, 2014

Last card as guest designer for i {heart} papers

Hey everybody,

Sharing my last card as Guest designer for i {heart} papers. It has been amazing journey guest designing for last two months. Thank you so much Tracy and Kate for giving me the opportunity.


Here is my card for you.

You make my heart sing  card

I have done some layering on my card. Not layering the stamps but layering pattern papers. Something I normally not do. Gone are the day when I layered pattern papers on my scrapbook pages. Yes, I was a scrapbooker and my style was layering papers and embellishments. From that to now making clean and simple cards - what a change? Anyway I have used Love it stamp set from My Favorite Things which I stamped and coloured using Distress markers. I have used coordinated border stamp set to stamp the borders and coloured them as well. I trimmed this watercolour paper and layered with pattern papers from Chickanniddy Crafts Date Night and Twirly Girly 6 x 6 paper pad. I then made a bow using jute thread which I adhered using glossy accent. I then layered the bow with a wood veneer heart shape which I have inked with red ink. Finally accented with some enamel dots. I let the sentiment be the focal point and accented the colours using pattern papers and embellishment.

You can find all the products I have used  at i {heart} papers.

Date Night 6x6 pad Twirly Girly 6x6 pad Ultra Smooth Premium White Cardstock - 20 sheets

  Tim Holtz Distress Markers *2013 NEW COLORS* - set of 12 Love It


I have more news for you. i{heart} papers is having a moving sale right now. Yay!
You get 30% off on your order. Here is the code for you - moving2014.


Quick! Get in your order before products sell out. Happy Shopping!


My blog signature

Friday, June 27, 2014

Tag You're it! challenge and an announcement....


Hey everybody,

There is a new challenge in town. It is called Tag You're it challenge.
 Jackie Rockwell has start this one too. You should have heard of The Cutting Edge challenge which also started recently.

Tag You're It Challenge!


 It is all about tags. You can make a tag by itself if you are fond of making tags or you can add the tag you have made to your card or scrapbook page. You can even make a tag on journaling card. It is up to you. How cool is that?
And I am excited to announce that I am part of the design team. Thanks a lot for having me on your design team, Jackie! Check out Tag You're it challenge Blog to see who else is on the team to inspire you with their gorgeous tags/tag based papercraft.

Grab Your Badge For Your Blog!


We have a mini challenge today for you inspired by our guest designer Karin Ã…kesdotterWe're calling this a mini challenge because it will only run for 5 days. Our regular challenges will be every other week. We'll be focusing on creating CAS tag projects that will stretch our creativity. First up to inspire us is Karin Ã…kesdotter with this ADORABLE summer scene tag!


I really love how Karin used  distress inks to create the background. So with that as my inspiration and made my tag below.

Ahoy Matey tag!

To create the waves, I used the old method of tearing paper and using it as mask to sponge distress ink. That is what I did using four colour distress inks - Faded Jeans, Broken China, Salty Ocean and Peacock Feathers, to create waves on my tag. Then sponged Squeezed Lemon  and Mustard Seed distress inks for the sky for a sunset look. The pirate ship stamp set and die is from Clearly Besotted Designs. I simply die cut the ship and stamped on it. Finally stamped some skull on the waves, the sentiment on the top, assembled the ship on the tag. The other sentiment is stamped on a strip of cardstock, trimmed and foam mounted on the tag.
 Please read the HOW TO PLAY ALONG page before creating and submitting your tag related project. When you've created your project come back and add it to the Inlinkz.

We'll announce who's project was TAGGED a WINNER on Friday, July 4 at 9:00am EDT. Our first official 2 week long challenge will also begin then, with a special guest designer!

Now it's your turn. READY, SET, GO!
When you've created your project come back and link IT up.

My blog signature

Thursday, June 26, 2014

CAS(E) this Sketch Challenge #82

This is a second post. Here is my CASE Study Challenge Post.

Helloooo everybody,

I have new sketch for you to play with from CAS(E) this Sketch Challenge.
This sketch is by N@ Ali. This is one versatile sketch. 


You can do so much using this sketch - on the background and the elements.
 I went for an one layer card.
 Here it is for you

hey girl smile card

I have used Scenery: Big Bang Bling, Bubble Talk and The write Stuff Perfect Picture stamp sets from Winnie & Walter on my card here. I let the colour speak on my card as it is an one layer card. There is a lot of stamping, colouring and sponging of ink on this card. Only accent is the sparkly enamel dot on the camera lens.

It is you turn to play along. Head over to CAS(E) this Sketch Challenge Blog to see what the other designers did with the sketch and picture. You can also find the linky to link your project at the blog.

Have fun crafting!
My blog signature

CASE Study Challenge #197


Hiya everybody,

Welcome once again to a new CASE Study challenge #197. This is the last of Pamela Ho's card. She is such a talented papercrafter and I am lucky to CASE four of her cards. 
This is her muse card for you this week.


What inspired me are two things - all the stamped circles and the colour combination of black with pop of orange. I being a bright girl, used a lot of orange with pop of black on my card below.

Rock star card

I die cut Bubble cove rup die from Simon Says Stamp using scrap cardstock and used it as a stencil to sponge some bright neon orange Hero Arts ink. I then randomly die cut small circles using a small circle die. I used MFT's Rock On stamp set and stamped the sentiment and the images in black. Finally used black enamel dots here and there. Very happy with how I CASed this card. I am sure my son will love it to give his friend.


Come and play along with us.


My blog signature

Saturday, June 21, 2014

Guest Designing for The Cutting Edge Challenge

Hellooooo everybody,

 I participated in the guest designer challenge conducted by The Cutting Edge Challenge recently. This was the card I made for the challenge

Happy Birthday to you card

 The team voted and I am so happy to announce I am Guest Designing for The Cutting Edge Challenge Yay!  Thank you so much team for picking me.
 I got display this fab badge on my blog.  


Watch out for my project on first week July. The challenge is awesome and you will love it. 
Hope you play along with me :)

My blog signature

Friday, June 20, 2014

FAB - O!

Good Morning!

I have a card share for you today using a lot of stencils work and sponging and very less of stamping.
This is my third card as Guest Designer for i {heart} papers this month.


This is a clean and simple card where the colours makes an impact. Here is the card for you.

You are FAB_O card

I am recently drawn towards Green and Navy colour combination with a bit of gold. In my opinion this combination is more mature and masculine in nature. Don't ask me why I feel it a mature combination - just a vibe lol!
Anyway, I have used Heidi Swapp 3 x 4 Mini Stencils Patterns and Words to make this card. There are gorgeous patterns in the stencil pack and I was drawn to the triangle pattern. I sponged green and navy dye inks using sponge dauber randomly on to the triangles, moved the stencil and repeated the same until I was satisfied with the coverage of the triangles on the card front. I then sponged the FAB - O word on a strip of white card stock using navy ink. I have used Simon Says Stamp Green Apple and Soft Navy inks here but you can pretty much use any dye inks. i {heart] papers have plenty of dye inks from Hero Arts which will work perfectly. Now the only stamping I did was the ' You are' which is from MFT. Finally accented with the gorgeous sparkly gold enamel dots from Charmed collection from My Mind's Eye. I really love how simple the card is to make and what a big impact the colour makes. I love these mini stencils from Heidi Swapp.

Here are the products I have used on my card. You can find them all at i {heart} papers shop.

3x4 Mini Stencils - Patterns 3x4 Mini Stencils - Words

Ultra Smooth Premium White Cardstock - 20 sheets Record It Enamel Dots - Charmed


I have more news for you. i{heart} papers is having a moving sale right now. Yay!
You get 30% off on your order. Here is the code for you - moving2014.


Quick! Get in your order before products sell out. Happy Shopping!

My blog signature

Thursday, June 19, 2014

You are beautiful!


Hey welcome back. This is my second post. My first post is HERE
--------------------------------------------------------------------------------
Today for CAS(E) this Sketch, we are playing along FUSION challenge as well. Yay! There is not one but two challenge to play. Here is the combo for you.


You can use the sketch only, the inspirational picture only or the both. It is up to you. I did used both the inspirational picture and sketch to make my card. Here it is for you.

You are beautiful

I have used predominately gold, white and a splash of black on my card. I have stamped the background using gold. Die cut the banner using vellum. I added the wood veneer spiky circle. Stamped the butterfly on the die cut using gold ink. The sentiment is stamped on  panel and the part of the sentiment is stamped on a strip of card stock and mounted using foam. Finally accented with the gold enamel dots. I really love the classic and elegant colour combo. Very happy with the result.

It is you turn to play along. Head over to CAS(E) this Sketch Challenge Blog to see what the other designers did with the sketch and picture. You can also find the linky to link your project at the blog.

Have fun crafting!
My blog signature

CASE Study #196


Hi, Hello and G'day everybody. Welcome back to my blog.

 I have another Pamela Ho muse for you from CASE Study Challenge Blog today to CASE in case you missed the previous ones.
Here is her new muse card.


I love the sponged sky and the cityscape on the bottom of the card. I am going to CASE them but with a difference. I am going for the watercolour technique on my card :) Here is my card.

Wicked birthday card

I have used water colour paper for my card front trimmed to the card front size. I stamped the New York city skyline from the Altenew stamp set called Sketchy Cities America I watered coloured the building with distress inks. I also water coloured the sky. Once dry I stamped the sentiment in black and the "New York" in second generation black ink. I added some sketchy lines and spatter for added interest. I then adhered this finished watercolour panel on the card front. It is a one layer card. I really love the colours on the city sky line.


Come and play along with us.

My blog signature

Wednesday, June 18, 2014

My first Winnie & Walter post...

Hellooooooo dear friends,

 I have a sneak peek of a card for you today.
 This is my first card as The Talent for Winnie & Walter.


 Yay! I am excited to show you my sneak peek. Without any more delay, here it is:

Say Cheese it is your birthday close up

I have used two of Winnie & Walter new release stamp sets called Bubble Talk and The Write Stuff: Perfect Picture on my card. Plus I also used The Write Stuff: Picture Perfect cut files. To see my card in full, head over to the Winnie & Walter Blog.  I love to know your feedback.

Thanks for stopping by!

My blog signature

Tuesday, June 17, 2014

Runaway Inspired Challenge #62

Helloooooo everybody, Welcome to another Runaway Inspired Challenge.
We have a gorgeous long navy dress today by ADEAM


What I loved about this dress is ombre navy from light on the bottom to the dark on the bodice with splash of white all over. I am inspired by this and tried to achieve it on my card below.

Happy Masculine birthday

For the background, I have used stencil and sponged three different navy colours to get the ombre. Then added a white panel on which I have stamped a balloon in navy and added the happy die cut which is stacked so it is raised for added dimension. The rest of the sentiment is simply stamped. Finally added some navy sequins I have brushed the balloon with Wink of Stella for shimmer. The bunched up thread adds to some texture. So this is my take on the new Runaway Inspired challenge. Check out Runaway Inspired Challenge Blog to see how the rest of the designers interpreted the challenge. Now it is your turn to play along. Cannot wait to see what you do :)

Thanks for stopping by!

My blog signature

Monday, June 16, 2014

Colourful balloon birthday card..

Hey everybody,

I played along Jackie's new challenge search for Guest Designer at The Cutting Edge Challenge Blog.


I am inspired by the balloon card. Love the colourful balloons on the second middle card. So here is my card inspired by the balloon card.

Happy Birthday to you card

I sponged a white cardstock with various colour distress inks. I used the smallest balloon die from the Balloon die set by Simon Says Stamps to die cut the balloons. I then sponged a bit more colours to add shading to the balloons. For the background I used Linen background stamp by MFT and Gray Flannel Memento Luxe Ink. I then added the black twine to the balloons and assembled them as a bunch using foam adhesives. I tied twine and glued it to the card panel. I stamped the birthday sentiment on to the banner and adhered. Finally accented with the gorgeous and beautiful sparkly clear sequins from Pretty Pink Posh.

I am looking forward to tomorrow. I am meeting a online craft friend from New Zealand. Excited. Cannot wait to see her. 

Thanks for stopping by!

My blog signature